When you’re just starting out learning how to play guitar one of the first things you need to understand is how to read chord boxes.
As a beginner guitar player, you might be intimidated by the look of these diagrams and the guitar chords chart. There’s no need to be. We’re not dealing with tricky music theory here.
Once you crack the system, reading them will be a breeze and you’ll be able to play thousands of songs.
In this guide, you’ll learn how to play simple guitar chords.
Here’s what we’ll cover:
[toc]
Chord Diagram Grid Explained
Before we discuss what all the circles and dots mean, let’s look at the basics. You’ll notice a typical chord box it has a grid-like structure, with six lines going down and horizontal lines going across.
Does it look familiar? It should do. It represents the fretboard of a guitar.
Each horizontal line on the chord diagram represents a fret, starting at the 1st fret, 2nd fret, etc. going down the neck all the way to the 20th fret (or however many you have).
As you can see below, the vertical lines represent the strings. The one to the far left is the thick low E string (shown as a slightly thicker string in the diagram). The high E string is to the far right.
Ok, so far so good.
By the way, do you see that black line at the top of the diagram? That represents the nut of the guitar. If you see that at the top of a chord box, you instantly know it’s referring to the first few frets on the neck.
The Dots
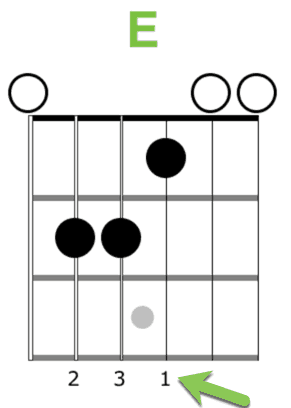
Now, let’s take a look at one of the most popular guitar chords, the E major chord. See those black dots? They indicate where to hold down with your fingers. So in this case, it’s telling you to press down on notes B, E, and G#.
Numbers Below Diagram
Notice the numbers at the bottom? Well, these tell you which fingers to use. Which finger you use it entirely up to you, but these are the recommended fingerings so it’s worth giving them a try.
The fingers on your left hand (if you’re a right handed player) are numbered from one through four (every so often you may see a ‘T’ symbol – that means use your thumb to fret that particular note).
So what you should end up with is this:
You put your middle finger (no.2) on the second fret of the fifth (A) string. Your ring finger (or no.3) on the same fret, but on the fourth string (the D). Finally, your index finger (no. 1) goes on the first fret of the third string (G).
Letters Above Diagram
X and O Symbols
You might have wondered what are those ‘X’ and ‘O’ symbols above some of the charts mean. Well, when you see an ‘X’ symbol that means don’t play that string.
Similarly, when you see an ‘O’ it means you should play that string along with the ones you’ve pressed down.
Barre Chords
As you learn more chords you’ll come across ones that look this:
This is called a ‘barre (or ‘bar’) chord’ as you’re literally barring across the fingerboard with your index finger. Barre chords are notoriously hard for beginners, but they’re an important technique to learn.
The open F chord is, in fact, a type of barre chord, though a mini one (only barring two notes).
Guitar Chords Chart for Beginners (Basic Chords)
So now that you understand how to read these patterns, you’re all set to learn some beginner guitar chords.
Below you’ll find an open chords guitar chart. There’s only nine to learn. Learn them all until they become second nature to play. With this basic guitar chords chart, you’ll unlock thousands of easy guitar songs.
Summary
Once you’ve learned how to read these basic beginner guitar chords, you should practice moving seamlessly between them. In time you’ll get quicker. There are tons more shapes to learn but focus on these to begin with.
From there, you should check out our guide on how to read guitar tabs (also called ‘tablature’) which is especially helpful for learning lead guitar (as opposed to rhythm guitar). Learn some basic strumming patterns and use the circle of fifths for building your own progressions and transposing them to any key.
Good luck!


